How to install manually wordpress in your Android
 |
| install wordpress in your android |
You may be intrigued to realize that you can introduce WordPress on your Android phone. Indeed, you read that right. WordPress is the most well known CMS (short for content administration framework) which is utilized by a large number of sites on the web.
.jpeg)
On the off chance that we characterize WordPress in additional straightforward words, it is only a product program (like some other programming of the PC) yet it deals with the web server to run sites. We would have the option to utilize WordPress on Android in the event that we can give it the right climate it necessities to work. Doing that is really conceivable.
Assuming you are new to the WordPress framework and need to learn it, then the most ideal way to begin is by introducing it on your Android phone. There is compelling reason need to spend your cash on purchasing a web server. Aside from that, you can likewise play with WordPress and test anything you need without influencing the progressions on your genuine site.
Moves toward arrangement WordPress site on Android
Prior to moving to the means, we should initially list down the things you should arrangement WordPress on Android phone -
A web server
MySQL data set
phpMyAdmin
WordPress programming
You can set up these things utilizing an application named KSWEB. This application incorporates server, PHP, MySQL data set, FTP and other web modules. With simply a solitary snap, you can make a nearby server on your Android phone. There are three web servers accessible: Lighttpd, Apache, and NGINX.
You can download the KSWEB application from the Google Play Store. The preliminary variant of the application gives admittance to these assets just temporarily period. You can either redesign it to the star rendition or download the broke/MOD application of the KSWEB from the web.
Kindly ensure that the application rendition is viable with your Android adaptation.
Stage 1. Arrangement web server, MySQL, and phpMyAdmin
Send off the KSWEB application on your Android telephone whenever it is introduced effectively. You will be approached to give it capacity access. From that point onward, the KSWEB application will start the introducing system to introduce parts like MySQL, PHP, server, and so on.
For introducing WordPress, we will involve the Lighttpd server as it comes free in this application. In the Status tab, ensure that the Lighttpd, MySQL, and PHP is dynamic. You can likewise go to their separate tab and check assuming the Empower server button is turned on.

For utilizing phpMyAdmin, you need to download some concentrate parts. Basically, go to the Instruments tab and snap the phpMyAdmin choice. From that point forward, the KSWEB application will consequently download, extricate, and introduce the fundamental records.
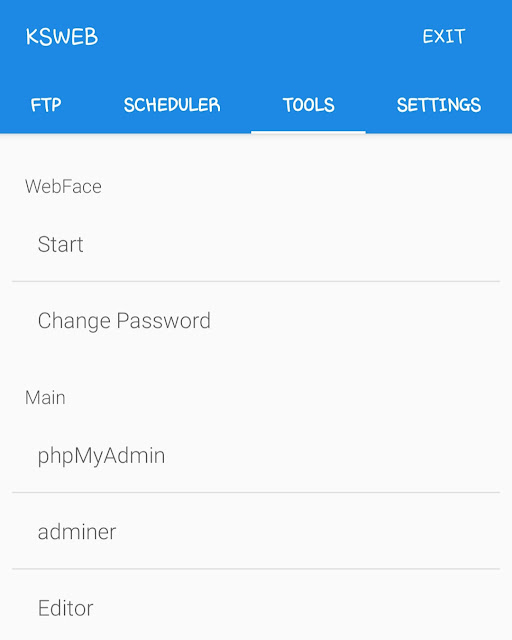
In the event that you return to the Status, you will see two hosts under the Lighttpd server. Have 0 focuses to http://localhost:8080/address. It's for the actual server. Then again, Host 1 focuses http://localhost:8081/address. It's for the phpMyAdmin web interface.
Stage 2. Make MySQL information base for WordPress
Presently we will make another MySQL data set for WordPress. WordPress needs a data set to store all essential site information, for example, usernames, passwords, posts, pages, remarks, and, surprisingly, the site subject and design settings.
We will make this data set utilizing phyMyAdmin. There are two different ways you can get to it. It is possible that you can straightforwardly open http://localhost:8081/address in any internet browser (for example Google Chrome) on your Android telephone or go to the KSWEB application > Devices and snap the phpMyAdmin choice.

Presently you will see a login page on the phyMyAdmin web interface. The default username is 'root'. Leave the secret phrase field clear and tap the Go button to proceed. Then, click the Data sets choice at the top. Under the Make data set area, enter the information base name for your site and afterward click the Make button.

You can give it any name you need however ensure you recollect it later. As in the above picture, we have given it 'wordpress' name.
Stage 3. Introduce WordPress on the server
Your information base is prepared at this point. The last step is to introduce WordPress on the server. You need to download the most recent variant of WordPress from its true site. It arrives in a Compress record so you have unarchive it. For this undertaking, it is possible that you can utilize the inherent record director of your telephone or any outsider application like ZArchiver.
Then, you need to reorder the WordPress envelope you have removed in the htdocs organizer on your inside stockpiling. The htdocs envelope is set as the default root registry of your server. Whenever you have set the WordPress envelope there, open Google Chrome or some other internet browser and go to http://localhost:8080/wordpress address.
You will see the WordPress introducing page now. Select your language and tap the Proceed with button. Click the How about we go button on the following page. From that point forward, you need to enter the information base association subtleties -

Data set name - enter the name of the data set you have made in the second step. We have named it 'wordpress'.
Username - transform it to 'root'
Password - keep this field clear
There is compelling reason need to change the information base host and table prefix. Whenever you have filled these subtleties, tap the Submit button. Congrats! You've finished every one of the significant stages. Presently you can run the establishment cycle and keep setting up your WordPress site.
Likewise read this instructional exercise: How to introduce WordPress locally on your PC
So that is the manner by which you can introduce a WordPress site on your Android telephone by making a neighborhood web server, PHP, and MySQL information base. Trust you find this data supportive. Proceed to attempt it now. On the off chance that you deal with any issue in the above advances, share it with us in the remarks underneath so we can take care of you.